Van Build (Final Steps)
And here we are, pretty much at the end of the build. With the exception of the fridge and the end of the cabinet around that, I've finished the van. In this post I take you through the walls, cabinet/bed, painting, sink/toilet, and the sewing projects. Pulling these things together was so hard, but really rewarding because at the end of each step things became closer and closer to the finish line.
Walls
These were pretty straight forward as well. Basically following the same concept as the ceiling with tongue and groove panelling. Except I did want a little cubby in the one wall, just to make it a bit more interesting then solid panels going across and because I want a space to fit books and charge devices. This was my first really tricky component to build. And it took me a couple attempts and still didn't turn out perfectly. But rather then redoing it once I got a bit more competent with cabinets and fiddly bits, I decided to keep it as is. I feel like the wrestling that I did to get it to work and fit, needed to be preserved haha. The opposite was was basically going to be entirely shelving and cabinets. So after I was done the wall behind my bed, I was ready to move on to the furniture.


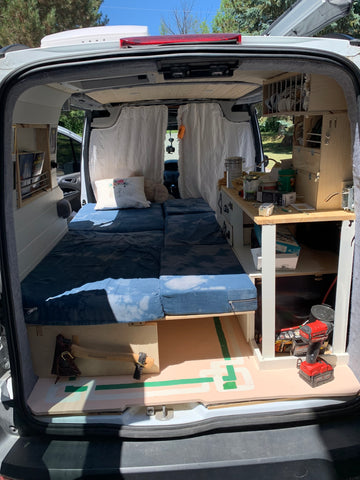
Cabinets/bed
I've lumped these together because I started, undid, and restarted both of them about 3 times each. So I figured I'd gloss over the struggle in the same paragraph. I'm not even sure if I'm really done the bed at this point that I'm writing from the future, but its functional and stable so I'm going to leave it as is until one of those things changes. One of my biggest obstacles was that I wanted to be able to remove the whole bed frame from the van for when I used it to transport stuff for big art shows. Because of that I wasn't able to fix the frame in place and use the same methods as so many other builds that I had seen. I wanted to keep it relatively light so it could be lifted out and I wanted it to be a bit of a sectional for more sitting options and so I could convert my bed while being inside with all the doors closed (learned that one from Eamon and Bec and their van Trinity). In the end I figured it out, but it really was redoing the converting component about 3 or 4 times that did it. As for the cabinets, I made them a bit too narrow, then widened them, but then realized I actually could make then narrower. Luckily this was only the bottom from that I was do again and again, so I wasn't fully dissembling all the drawers, doors etc. After having some issues with my fridge, I just decided to continue on and leave a space from my future fridge.


Sewing
There were a few sewing projects that I tackled in this. The cushions, the curtains for the front and the back window, and some sheets for the bed. Everything had to be taken in and out of the van, pinned in place and small changes made while comparing it to the shape of the wall or the curve of the window, or the width of the bed. So these all ended up taking quite while. But it was a such a nice change from all the wood working that I had been doing that I didn't mind the time it was taking. Pretty stupidly I chose a lot of while for the fabrics, but I got almost everything from a thrift store so even if things to get a bit dirty, at least they didn't break the bank. I also lined all the curtains with blackout fabric and I have to say that I can sleep longer in the van then I can in my own bedroom! So that was a great decision.


Painting
Again I chose to use quite a bit fo white, on, well, everything. The cabinets, walls, even the floor is a very light pink. Again it's going to get dirty fairly quickly, but I'm so happy with the result that I don't even really care.


Door Panels
I had umm'd and uhh'd over what to do with the door panels for ages. Finally I was watching a tiktok about someone's home office reno and I saw that they used peel and stick wallpaper and I thought "that would solve both the aesthetic and functional aspects of the door panels. I wanted something that looked nicer then just white painted particle board, but would be able to stand up to moisture if the doors were caught open in the rain. So I ordered a few samples online and decided on a black floral one. I thought it would balance the amount of white that I had going on in the van and hold up well since the doors are really high traffic areas.


Sink/Toilet
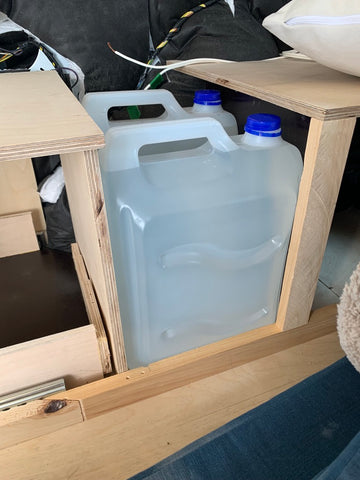
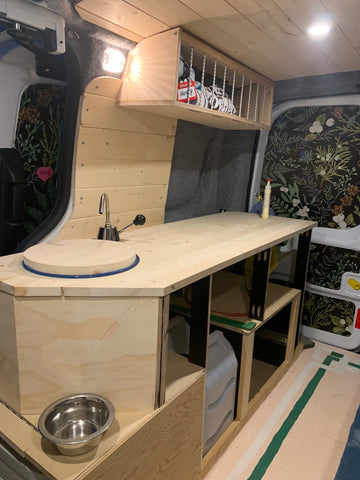
I knew from before I got the van that I needed to have a toilet in it. If I was ever going to attempt to sleep in a parking lot then I needed to know that I could safely go to the bathroom in the middle of the night. So I ended up constructing the cabinets around a Dometic cassette toilet that has worked pretty well. I have it on drawer sliders so it can be tucked out of sight ( you can see the end of the drawer in the first photo below), but in easy reach for the night. I wasn't always sure if I wanted a sink or not, but once everything else was coming into place I decided having a little hand pump sink would be a nice addition. I found an enamel bowl at a thrift store and with quite a bit of effort, drilled a hole and converted it into a sink. Underneath the cupboards is quite a simple set up with fresh and grey water in 10 litre jugs that I found at a grocery store. They happened to fit perfectly and the water tubing just sits in each opening without to much trouble. It's not a ton of water, but it gets me through about 3-4 days depending on how careful I am. I might buy another fresh water jug so I have a reserve on hand, but I haven't quite needed to yet.

And I think that is where I will leave it for today. All the last little bits are small improvements or elements that are really about personal preference or convenience like using bungie cords, drawers on the bed, or using a leather belt for all my cabinet handles and knobs. I plan to do a full van tour over on my YouTube at some point as well so I'll make sure to link to that in the next blog post that shows the full interior.