Van Build (Next Steps)
In my last post I talked about the first 4 steps of my van build. In this one I'm going to be talking about the next four (wiring/electrical, carpeting, ceiling, & the floor). I think these four steps were the time that it felt like my van build was actually becoming something. Before this it was still looking very much like a cargo van just with random silver patches and insulation.
Wiring/Electrical
This was something that I can decided to go pretty minimal on when I was considering how to do my van. I was a bit nervous about working with the electrical component and every video I watched was a bit confusing. So my plan was to put some battery operated lights in and maybe run my fan with my portable battery bank. But then I was chatting to my dad about it and he said that if I was going to do this I needed to do it right. He also offered to do the wiring and hook everything up for me, so really that was what made me decide to do it 😆. We watched a few videos on the best ways methods and decided to use some extension cords we had at my parents house. After the project was done, my dad did mention that we should have just used some auto wiring, so maybe don't do the same thing we did. But it did actually work out well, because everything is extra protected in the walls of the van and so I do feel good about it. In the end I have 3 overhead LED lights connected to a dimmer dial, the fan, 2 usb spots that have 2 outlets each, a battery gauge for charge levels, and a fridge (well almost a fridge). I also have a 120v outlet but it's actually only active when I have shore power, which hasn't been too often. The leisure or house battery is hooked up to the car battery via a cable so it can be charged while I drive. So far, it's been more then enough for my small amount of requirements and I'm quite happy I listened to my dad and did a more elaborate electrical set up.

Carpeting
I wasn't sure how I wanted to finished up all the little curved bits in the van. I've seen some people manage it quite well and other people do a less then great job. So I decided that auto carpet was a good way to cover some of the tricky bits and make things finished looking. I'm really happy with the results I got. I watched a few videos on how to install and after a couple attempts I managed to get the hang out it. Auto carpet is really forgiving and I was able to save minor mistakes if I was quick enough. I also used up most of the carpet I bought which I completely guessed about how much the project would need, so I'm thrilled that it wasn't too much but also that I didn't run out in the middle of the important parts. I would definitely recommend this to someone who doesn't want to worry about fitting wood panelling around tricky curves or small corners.
(I used carpet around the back doors, and also around the perimeter of the wall paneling, of course I did this before I installed the panelling).


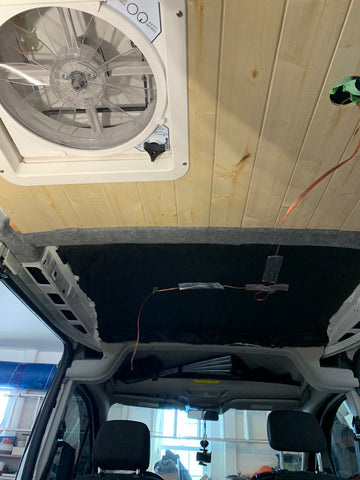
Ceiling
I was so focused on making the ceiling as high as possible that I decided to attach the paneling to the centre support beam at the sides instead of doing the panels the whole length of the ceiling. Doing the whole length would have been easier and much faster then what I did, but I would have lost about half an inch of height and it really does make a difference in such a small space. So my dad and I attached some wood strips along the sides of the beam and at each end of the ceiling so that I would have something to nail the paneling into (see the pictures because that description was horrible!). It ended up being sort of a tricky process, but we got there in the end and it was such a fun day when it was completed! When I lay down on the floor and looked up, I could almost imagine my van was done!


The Floor
I think we redid the floor 3 or 4 times? We started out taking out the rubber mat that the van came with and trying to use it as a template on the plywood like I had seen other people do with their vans. But the ford transit connect floor is really padded with foam and didn't lay flat on the wood so it was such a wonky outline. We got it in and realized that it just wasn't right. I also was really focused on keeping the wood as thin as possible (for that valuable height I wanted to keep in the van). I'm not going to bore you with all the trial and error we had with this floor, mostly because I don't want to relive how agonizing it was. But in the end we used a thicker plywood, that was a bit wider then the normal 4x8 foot pieces.


My dad also cut into the floor of the van to make use of the large space where passengers' feet would go in a passenger van version. So I have two cubbies under the floor that I use for my battery and electrical components and the other for shoe storage. I decided to just paint the plywood instead of adding more flooring on top like most people do. This was to stop more height disappearing, but also because using outdoor paint seemed like a pretty durable solution and then I could have some fun painting it with a design. I might actually do a full post on my floor painting because I really enjoyed both the idea process, the application, and the end result!


So this brings us into the more design elements of the build. Up until this point it was just getting things into place. I had a semi idea of how I wanted the bed, cabinets, and decor to look, but actually building it all out was definitely a challenge. And I'll cover that in the next post.
Thanks for reading! - Rachel